Room Prep for Painting: 8 Essential Steps for Professional-Quality Results
Getting ready to transform your space with a fresh coat of paint? The secret to achieving that flawless, professional finish lies in one crucial factor: proper preparation. Many homeowners rush straight to the fun part of painting, only to discover that skipping the prep work leads to disappointing results that won't last.
How to prepare a room for paint is more than just moving furniture around. It's a systematic process that sets the foundation for a paint job you'll be proud of for years to come. Whether you're tackling your first DIY project or you're a seasoned weekend warrior, following these essential steps will make all the difference.
Why Room Painting Prep Matters More Than You Think
Think of room painting prep as the foundation of a house. You wouldn't build on unstable ground, and you shouldn't paint over unprepared surfaces. Proper preparation ensures better paint adhesion, smoother coverage, and longer-lasting results. It also saves you time and money in the long run by preventing common issues like peeling, bubbling, or uneven coverage.
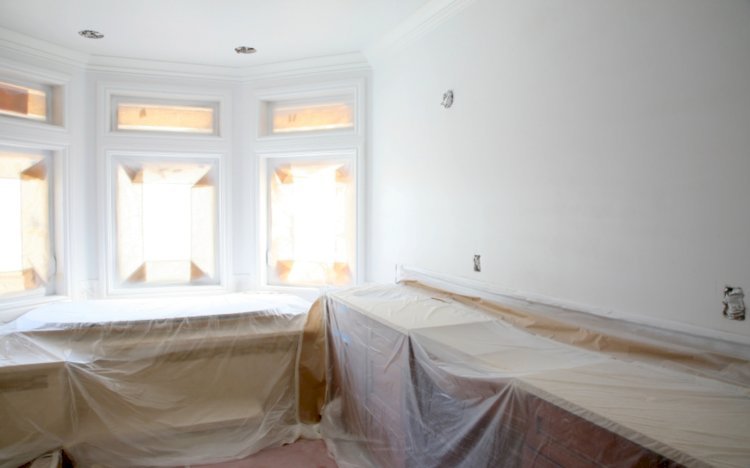
Step 1: Clear and Cover Furniture for Painting
Start by removing as much furniture as possible from the room. For pieces that are too large or heavy to move, push them to the center of the room and cover them completely. Use plastic sheeting or canvas drop cloths rather than old sheets, which paint can seep through. Secure the covering with painter's tape to prevent it from shifting during your work.
Don't forget about smaller items like picture frames, decorations, and electronics. Store these safely in another room to avoid accidental paint splatters.
Step 2: Protect Floors Before Painting
Your floors need serious protection during any painting project. Canvas drop cloths are the gold standard because they absorb spills and provide excellent coverage. Plastic sheeting works too, but it can be slippery and doesn't absorb moisture.
For carpeted areas, use plastic sheeting taped down at the edges. For hardwood or tile, canvas cloths provide better grip and protection. Make sure your floor protection extends several feet beyond your work area to catch any drips or roller splatter.
Step 3: Remove Outlet Covers Before Painting
This step separates amateur paint jobs from professional-looking results. Remove all outlet covers, switch plates, and light fixture covers using a screwdriver. Place the screws in small labeled bags so you don't lose them.
If you're changing paint colors dramatically, consider painting behind these areas too. It creates a much cleaner, more finished appearance when you reinstall the covers.
Step 4: Clean Walls Before Painting
Dirty walls are paint's worst enemy. Dust, grease, and grime prevent proper paint adhesion, leading to poor coverage and premature failure. Start with a vacuum using a brush attachment to remove dust and cobwebs from corners and along baseboards.
For most walls, a solution of warm water and mild dish soap works perfectly. Use a sponge or cloth to wipe down all surfaces, paying special attention to areas around light switches, door frames, and anywhere hands frequently touch. Allow walls to dry completely before proceeding.
Kitchen and bathroom walls may need stronger cleaning solutions to remove grease or soap residue. A mixture of water and trisodium phosphate (TSP) handles tough cleaning jobs effectively.
Step 5: Sanding Walls Before Painting
Not every wall needs sanding, but this step is crucial for certain situations. If you're dealing with gloss or semi-gloss paint, light sanding helps new paint adhere properly. Use fine-grit sandpaper (220-grit works well) and sand lightly to create a slightly rough surface.
Focus on areas with imperfections, nail holes, or previous paint drips. After sanding, wipe down the walls with a tack cloth to remove all dust particles. This step is essential because dust will show through your new paint finish.
For helpful guidance on this process, check out our detailed room painting preparation guide for additional expert tips.
Step 6: Fill Holes and Apply Priming Before Paint
Walk around your room with good lighting and mark any holes, cracks, or imperfections with painter's tape. Use spackling compound for small nail holes and mesh tape with joint compound for larger cracks.
Allow repairs to dry completely, then sand smooth and clean again. Priming before paint is essential over repairs, bare wood, or when making dramatic color changes. Quality primer ensures even coverage and true color representation of your topcoat.
Step 7: Master Painter's Tape Tips for Clean Lines
Good taping technique makes the difference between crisp, professional lines and messy edges. Use high-quality painter's tape designed for your specific surface. Press down the edges firmly with a putty knife or your fingernail to prevent paint bleed-through.
Apply tape to clean, dry surfaces for best adhesion. Remove tape while the paint is still slightly wet to avoid peeling dried paint along with the tape. Pull at a 45-degree angle for the cleanest removal.
Step 8: Final Room Painting Tips and Setup
Before opening your first paint can, double-check that everything is properly covered and protected. Set up your painting supplies in an organized manner with brushes, rollers, paint trays, and rags within easy reach.
Ensure proper ventilation by opening windows or using fans. Good airflow helps paint dry evenly and reduces fumes. Have a damp cloth nearby for quick cleanup of any accidental drips or spills.
Professional Results Start with Proper Preparation
Following these eight essential steps for how to prepare a room for paint transforms what could be a frustrating experience into a rewarding project. The time invested in preparation pays dividends in the quality and longevity of your finished paint job.
Remember that rushing through preparation is the biggest mistake most DIY painters make. Take your time with each step, and you'll achieve results that rival professional work. The satisfaction of looking at perfectly painted walls, knowing you did the work properly from start to finish, makes every minute of prep work worthwhile.
Ready to start your painting project? Visit our Website for more expert painting advice and professional services to help make your vision a reality.
What's Your Reaction?